Table of Contents
Welcome to Westernfordhcm's definitive guide to DIY oil changes! Maintaining your car doesn't have to be intimidating, and changing your oil is a great place to start. Whether you're a seasoned DIYer or a complete novice, this comprehensive guide will empower you with the knowledge and confidence to keep your vehicle running smoothly. In this guide, we'll cover everything you need to know, from troubleshooting car problems to safety tips, essential tools and materials, and a step-by-step walkthrough of the oil change process. By following our advice, you'll be able to tackle this important maintenance task efficiently and effectively, saving both time and money while ensuring your car performs at its best.

DIY Maintenance: Changing Oil - The Ultimate Guide to Do It Yourself
Step | Task |
|---|---|
1 | Gather necessary tools and materials. |
2 | Locate the oil pan and drain plug. |
3 | Place the oil drain pan under the drain plug. |
4 | Carefully unscrew the drain plug and allow the oil to drain. |
5 | While the oil is draining, replace the oil filter. |
6 | Tighten the drain plug and remove the oil drain pan. |
7 | Add new oil to the engine through the oil filler cap. |
8 | Check the oil level and adjust as needed. |
I. DIY Maintenance: Changing Oil
Trouble Shooting Car Problems
Ensuring the smooth operation of your vehicle requires regular upkeep, with changing the oil being a fundamental task. This task can be accomplished on your own, given the correct tools and a methodical approach. You can efficiently maintain your car’s health and save money by performing this simple yet valuable task.
Safety First
When embarking on any auto maintenance task, safety should be your top priority. Wear appropriate safety gear, including goggles and gloves, and work in a well-ventilated area. For your safety, it's important to avoid undertaking any task if you don't feel comfortable doing so. If you're unsure about any aspect of the process, don't hesitate to consult your vehicle's owner's manual or seek professional assistance.
There are several simple steps you can take to ensure your safety while working on your car. First, park the car on a level surface and engage the parking brake to prevent it from rolling. Secondly, disconnect the negative terminal of the battery to avoid any electrical hazards. This simple step helps prevent the accidental starting of the engine while you're working beneath the vehicle.

DIY Maintenance: Changing Oil
II. Safety First: Essential Precautions
Inspect your vehicle regularly
Component | Inspection frequency |
|---|---|
Oil level and condition | Every month |
Tire pressure and tread depth | Every other month |
Brake pads and rotors | Every 6 months |
Battery | Every year |
Gather the necessary tools and materials
- Oil filter wrench
- Oil drain pan
- New oil filter
- New motor oil (check your owner's manual for the recommended type and amount)
- Funnel
- Rags or paper towels

Safety First: Essential Precautions
III. Step-by-Step Guide to Changing Oil
Essentially, changing the oil involves draining the old oil from the engine's oil pan and replacing it with new oil. Here's a step-by-step guide to help you do it yourself:
- Gather necessary tools and materials: Safety glasses, gloves, oil filter wrench, oil drain pan, new oil, new oil filter, funnel, and rags.
- Locate the oil pan and drain plug: Slide under the vehicle and locate the oil pan, which is usually a large metal pan at the bottom of the engine. The drain plug is typically located at the bottom of the oil pan.
- Place the oil drain pan under the drain plug: Position the oil drain pan directly under the drain plug to catch the draining oil.
- Carefully unscrew the drain plug and allow the oil to drain: Slowly loosen the drain plug using the oil filter wrench. Allow the oil to drain completely into the oil drain pan.
- While the oil is draining, replace the oil filter: Locate the oil filter, which is typically a cylindrical-shaped component connected to the engine. Use the oil filter wrench to loosen and remove the old oil filter.
Component | Purpose |
|---|---|
Oil pan | Holds the oil in the engine |
Drain plug | Allows the oil to drain from the oil pan |
Oil filter | Filters out contaminants from the oil |
- Tighten the drain plug and remove the oil drain pan: Once the oil has finished draining, tighten the drain plug securely using the oil filter wrench. Remove the oil drain pan from under the vehicle.
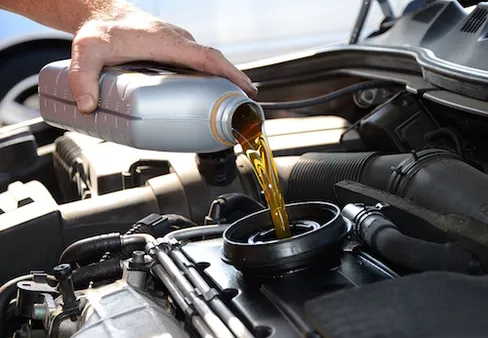
- Add new oil to the engine through the oil filler cap: Locate the oil filler cap on top of the engine. Using a funnel, pour the new oil into the engine. Refer to your vehicle's owner's manual for the recommended amount and type of oil.
- Check the oil level and adjust as needed: Use the dipstick to check the oil level. The oil level should be between the "min" and "max" marks on the dipstick. Add more oil if necessary or drain some out if overfilled.
IV. Troubleshooting Common Issues
Oil Leaks
- Check the oil filter for proper installation and tightness.
- Inspect the oil pan and drain plug for any cracks or damage.
- Examine the valve cover gasket for leaks.
Engine Overheating
- Check the coolant level and top up if necessary.
- Inspect the radiator for any blockages or leaks.
- Ensure the thermostat is functioning correctly.
Battery Problems
- Check the battery terminals for corrosion or loose connections.
- Test the battery voltage using a multimeter.
- Inspect the alternator for proper charging.
Brake Issues
- Check the brake fluid level and top up if necessary.
- Inspect the brake pads and rotors for wear or damage.
- Ensure the brake lines are not leaking.
Suspension Problems
- Check the tires for proper inflation and alignment.
- Inspect the shock absorbers and struts for any leaks or damage.
- Examine the suspension components for any loose or worn parts.
Electrical Problems
- Check the battery terminals for corrosion or loose connections.
- Inspect the fuses and relays for any blown or damaged components.
- Examine the wiring harness for any breaks or shorts.
Transmission Problems
- Check the transmission fluid level and top up if necessary.
- Inspect the transmission filter for any debris or contamination.
- Ensure the transmission is shifting smoothly and without any hesitation.
Exhaust System Problems
- Check the exhaust system for any leaks or damage.
- Inspect the catalytic converter for any blockages or restrictions.
- Ensure the muffler is not rusted or perforated.
Fuel System Problems
- Check the fuel filter for any debris or contamination.
- Inspect the fuel lines for any leaks or damage.
- Ensure the fuel pump is functioning correctly.
Air Conditioning Problems
- Check the refrigerant level and top up if necessary.
- Inspect the compressor for any leaks or damage.
- Ensure the condenser and evaporator coils are clean and free of debris.

Troubleshooting Common Issues
V. Conclusion
Congratulations on completing your DIY oil change! By following these steps and adhering to the safety precautions, you have successfully extended the life of your vehicle and saved yourself a trip to the mechanic. Remember to check your oil level regularly and change your oil according to the manufacturer's recommended intervals. With regular maintenance, your car will continue to run smoothly and reliably for many years to come.